In a previous post about the privacy of running apps in general, we explained why these apps are a goldmine of personal data for scammers and criminals of all kinds: unfortunately, by default they share sensitive data — including one’s precise location — with virtually anyone. As we mentioned, the consequences can be dire — from leaking the locations of secret facilities, to stalking and even assassination attempts.
In the mentioned previous we also shared detailed instructions on general smartphone settings to minimize these risks. In this and subsequent posts, we discuss specific privacy settings for the most popular running apps. Let’s start with Strava.
Strava (available for Android and iOS) is arguably the most popular app for tracking running, cycling, and hiking workouts. And it’s also the only one that has remained independent: all other major running apps have already been acquired by sportswear giants. Incidentally, Strava has been at the center of several data privacy controversies — including the famous heatmap incident that exposed the location of numerous secret military facilities.
Strava is also often criticized whenever questions arise about how users can track each other through fitness apps. Frankly, these criticisms are still valid: Strava’s default settings are far from private — the app actively encourages you to share your data with the entire internet.
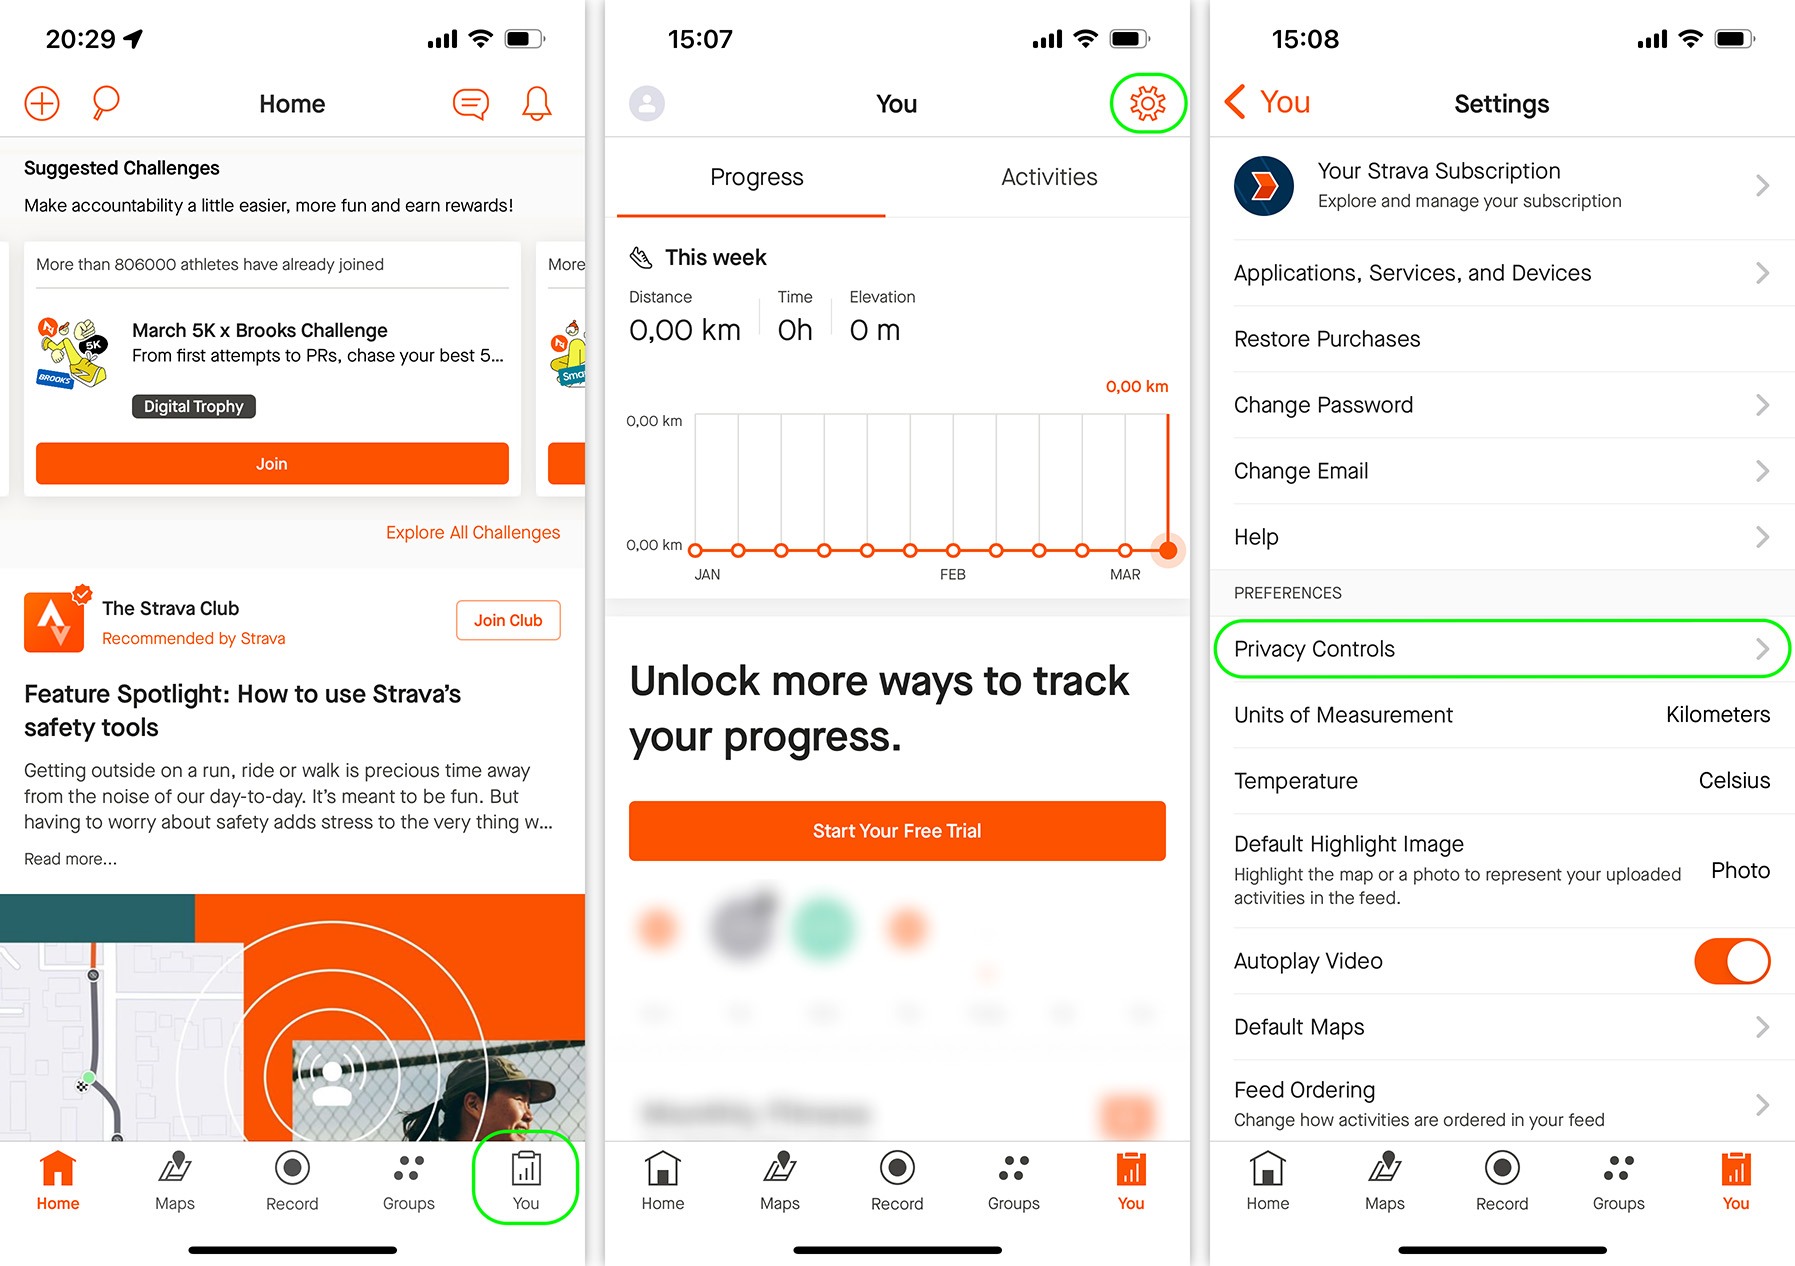
Thankfully, this can be fixed: Strava offers a decent range of privacy settings. To access them, tap You in the bottom-right corner of the screen, then tap the gear icon in the top right corner, and in the window that opens, select Privacy Controls.
First, make your profile private by selecting Profile Page and changing its visibility to Followers. Next, go through the options Activities, Group Activities, Flybys, Local Legends, and Mentions — and set them all to either Followers or — even better — Only You or No One.
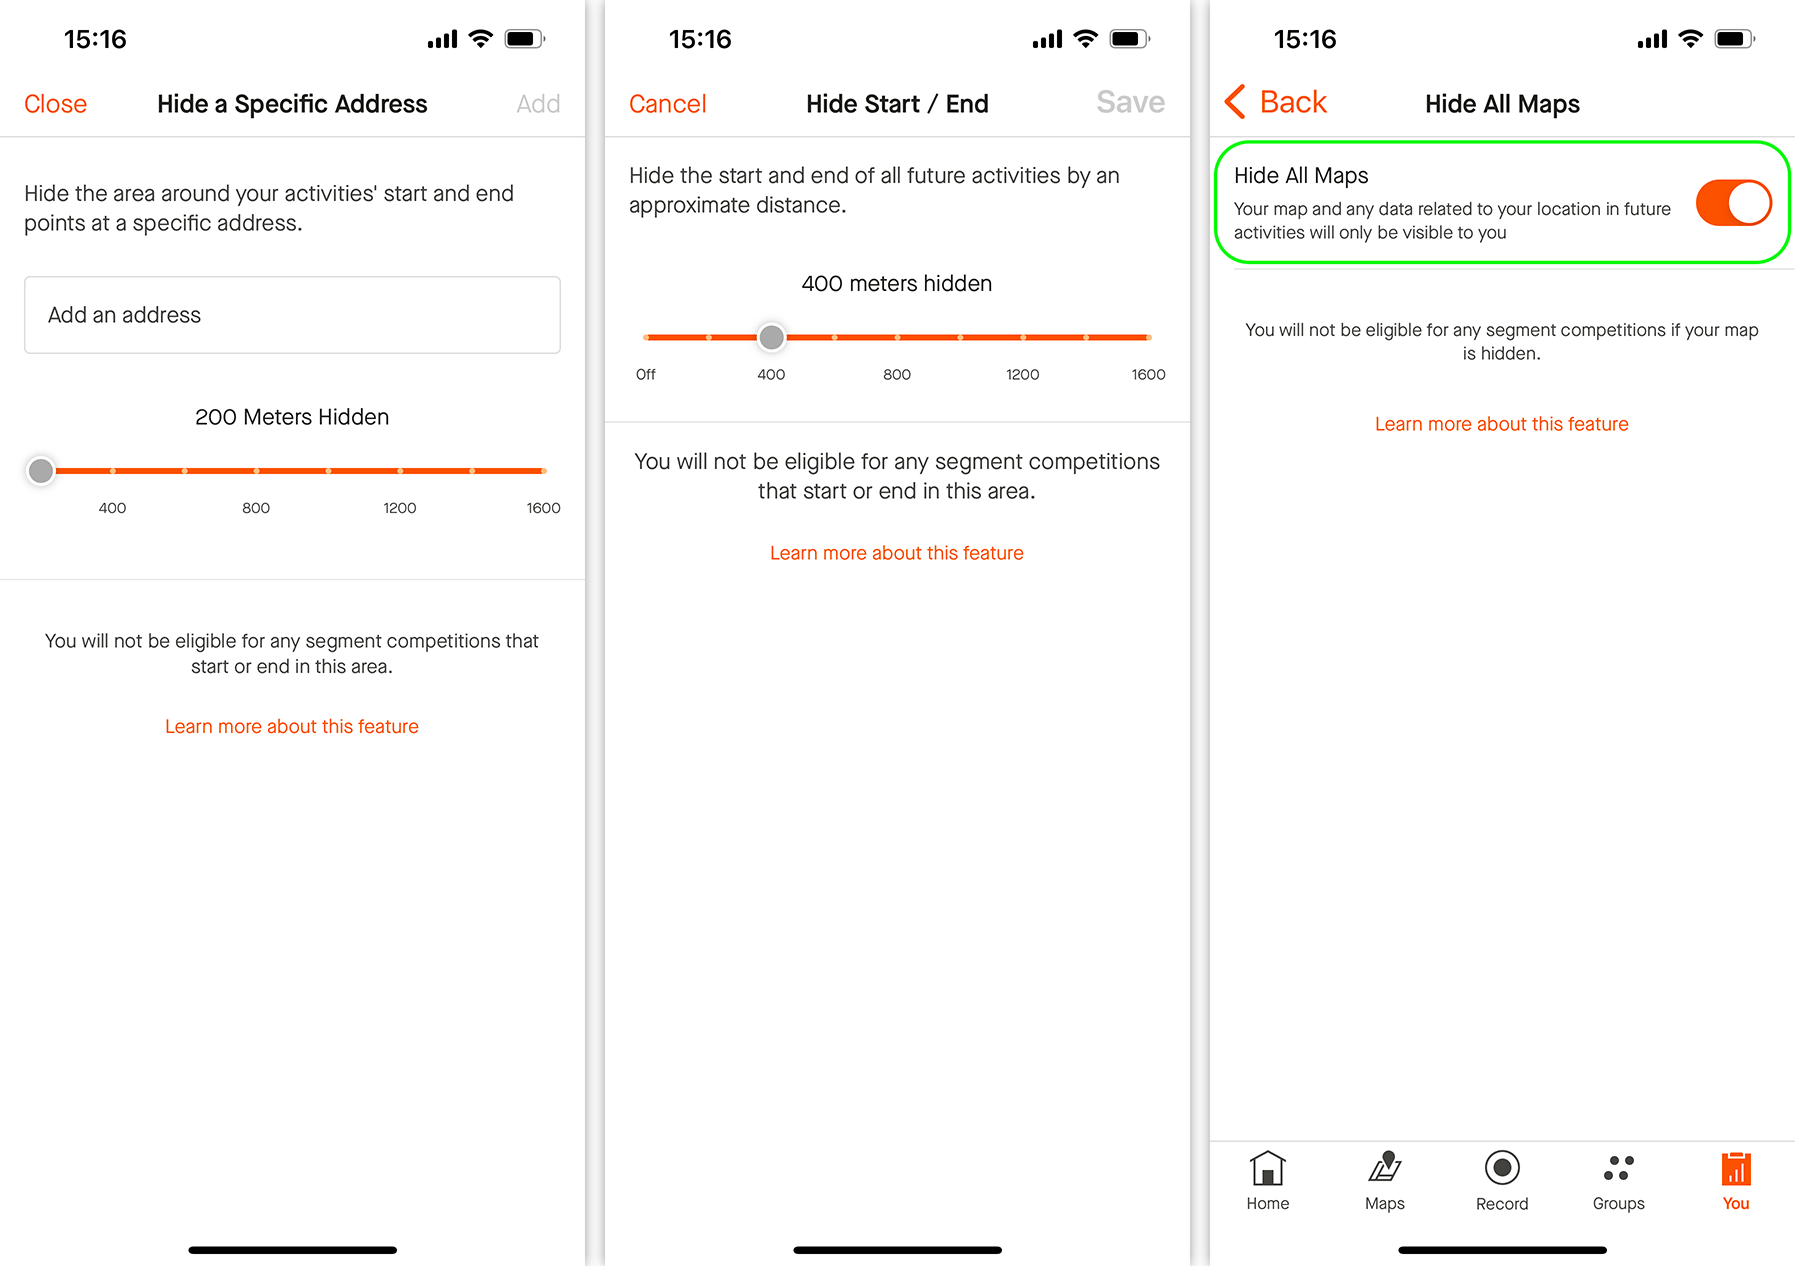
Now, we recommend going to Map Visibility and selecting one of the ways the app will hide your run/ride maps:
- Hide the start and end points of activities that happen at specific address. This feature allows you to use an address and a radius around it in meters to define an area where your movements will be hidden. This way, you can mask your regular start and finish locations — such as your home address.
- Hide the start and end points of activities no matter where they happen. Simply select a radius in meters, and any start and end points will automatically be hidden. This option is more convenient than the first one — and you won’t have to share your address with the app.
- Hide your activity maps from others completely. If you choose this option, all location data from your future (but not past) workouts will only be visible to you.

How to hide your activity location data in the Strava app: You → Settings → Privacy Controls → Map Visibility
Keep in mind that, if you use Strava frequently, hiding only the start and end points might not be enough. A study published in late 2022 demonstrates a method for pinpointing hidden locations with 85% accuracy. Therefore, we recommend choosing the third option: Map Visibility → Hide your activity maps from others completely → Hide All Maps.
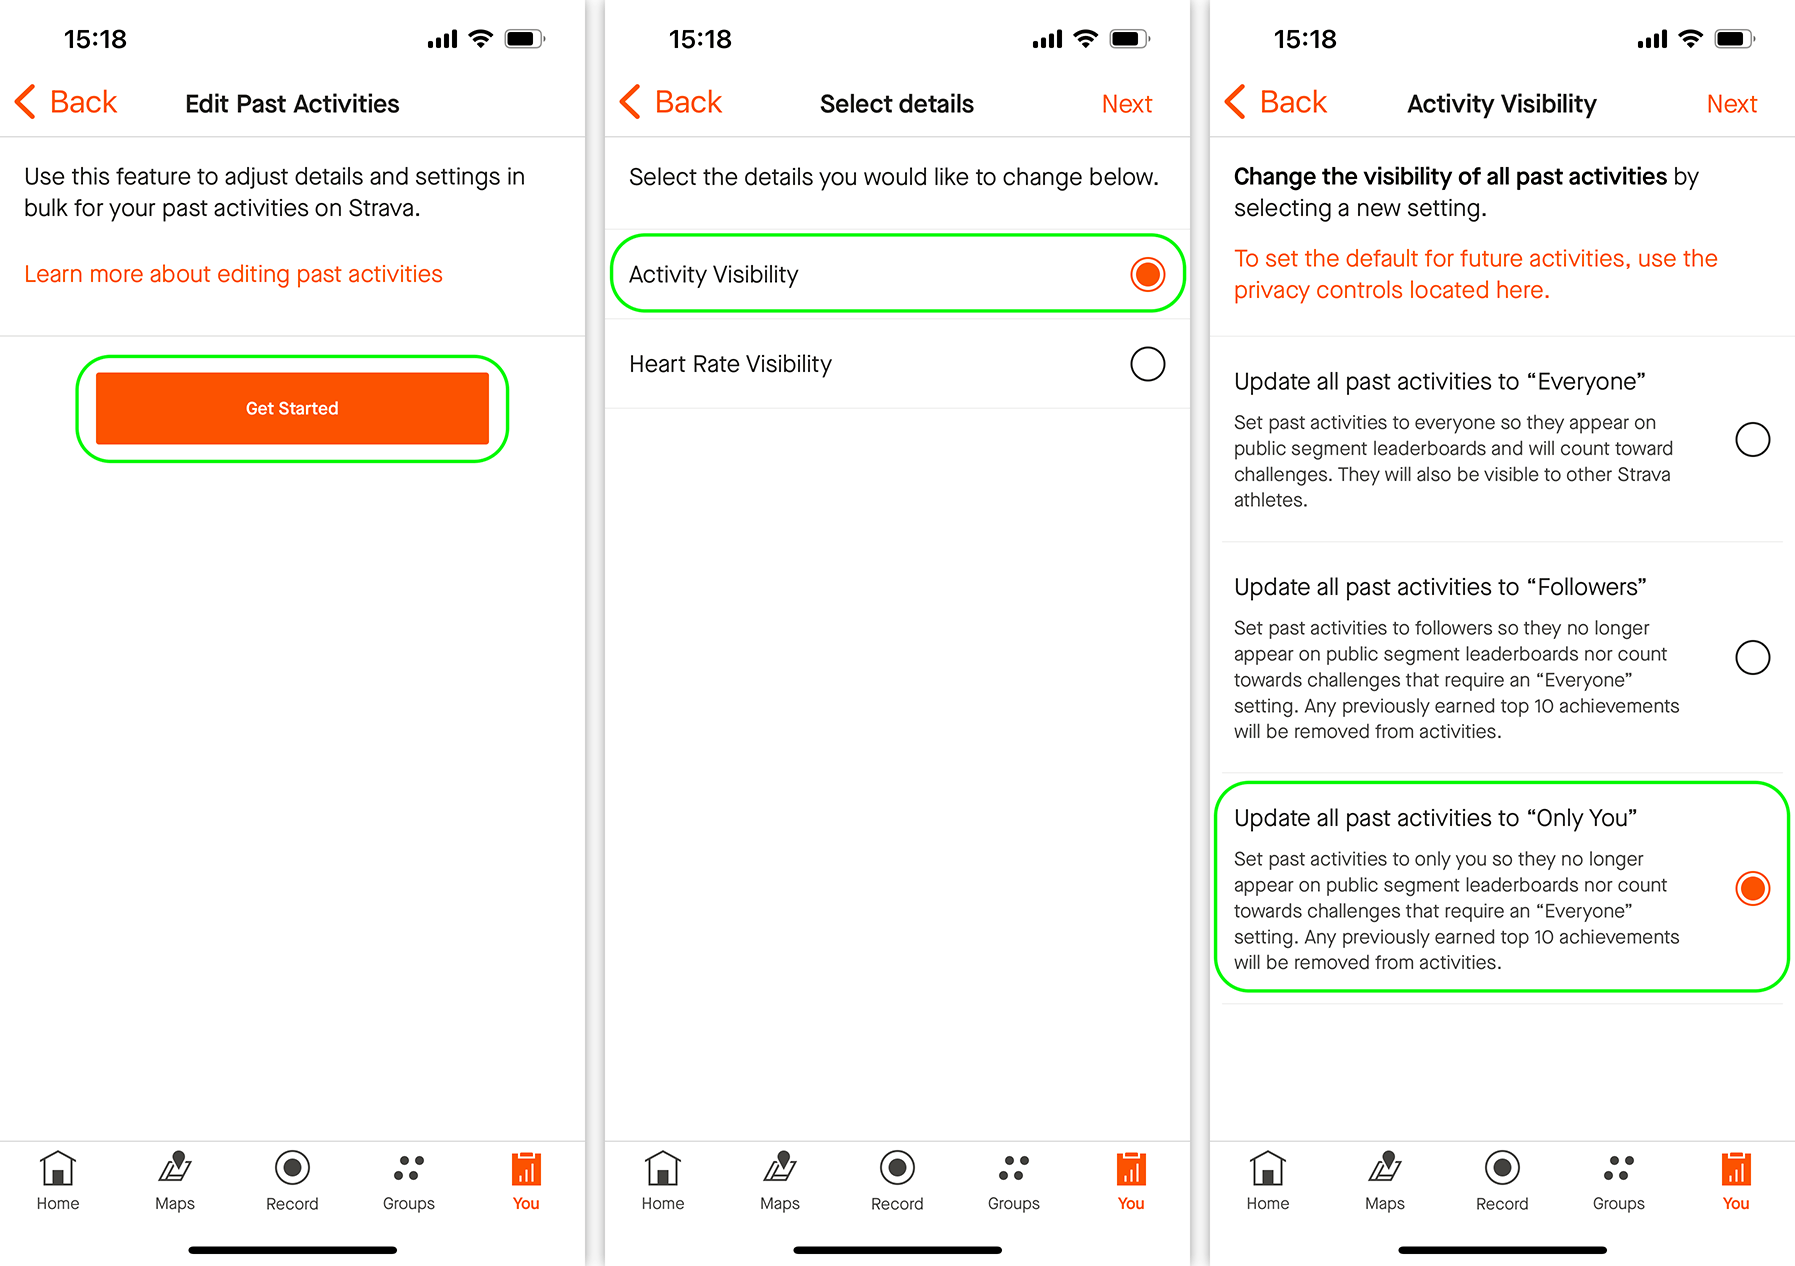
Note that the privacy settings in Strava aren’t retroactive. If you’ve previously recorded some workouts in the app, the hiding features won’t apply to them. To fix this, go to the Edit Past Activities section, tap Get Started, select Activity Visibility, and tap Next. In the next window, choose either Followers or Only You and tap Next again. After a while (not instantly), your past activities will be hidden.

How to hide past activities in the Strava app: You → Settings → Privacy Controls → Edit Past Activities
The next tip is for those who regularly exercise at sensitive locations and don’t want to accidentally expose them. Go to Aggregated Data Usage and toggle off Contribute your activity data to de-identified, aggregate data sets. After this, your runs won’t appear in places like Strava Metro, the Global Heatmap (the one that leaked the military base locations), Points of Interest, Start Points, or Community Generated Routes.
Go to Public Photos on Routes and disable Share photos with the community. If your profile is private and your activities are hidden from the public, photos you add to your runs shouldn’t be visible anyway. But just in case Strava decides to change things, it’s best to disable this feature explicitly.
Finally, go to Do Not Share My Personal Information and toggle on the switch. This will prevent Strava from selling your data to third parties for targeted advertising (or whatever else those parties might be up to).
Congratulations, you’ve now properly set up your privacy in Strava!
If you use other running apps to track your workouts, check out our guides for configuring their privacy settings:
You can learn how to set up privacy in other apps — from social media to browsers — on our website Privacy Checker.
And Kaspersky Premium will maximize your privacy and protect you from digital identity theft on all your devices.
Don’t forget to subscribe to our blog for more how-to guides and helpful articles to always stay one step ahead of scammers.
 privacy


 Tips
Tips